进程间通信(IPC)是一组编程接口,允许程序员在操作系统中并发运行的不同程序进程之间协调活动。这使得程序能够同时处理许多用户请求。
| 组件/线程 | 描述 |
|---|---|
| 事件 | 在测试台中,不同的线程通过事件处理句柄进行同步 |
| 信号量 | 不同的线程可能需要访问同一资源;它们通过使用信号量轮流进行访问 |
| 邮箱 | 线程/组件需要彼此交换数据;数据被放入邮箱并发送 |
1-事件#
事件用于在两个或多个同时活动的进程之间进行同步。首先,我们需要声明事件,然后使用 -> 或 -» 操作符来触发它。
进程可以通过使用 @ 操作符或 wait(event_name.triggered) 来等待事件。当 @ 和 wait 同时出现在同一点时,就会发生竞争条件。
创建事件:-
event e;
触发事件:-
->e;
等待事件被触发:-
@e;
or
wait(e.triggered);
@ 与 wait 操作符的区别:#
通常,@ 和 wait 操作符都用于等待事件被触发。@ 和 wait 的主要区别在于,当等待事件和触发事件同时发生时,@ 无法检测到触发,而 wait 可以检测到事件的触发,然后执行。让我们通过下面的代码来看一下 @ 和 wait 的区别。
代码片段:
module wait_example;
  event e;
  initial begin
    $display($time,"\t 触发事件");
    ->e;
  end
  initial begin
    $display($time,"\t 使用 wait 等待事件");
    wait(e.triggered);
    $display($time,"\t 使用 wait 触发事件");
  end
  initial begin
    $display($time,"\t 使用 @ 等待事件");
    @(e.triggered);
    $display($time,"\t 使用 @ 触发事件");
  end
endmodule
在代码中,事件的触发和等待发生在同一时间点,即 0ns。wait 将触发事件,而 “@” 无法检测到触发。
代码输出:
在输出中,我们可以看到事件的触发和等待发生在同一时间点,即 0ns,然后 wait 可以检测到触发,因此显示了语句 ‘使用 wait 触发事件’,而 “@” 无法检测到触发,因此 “@” 下面的显示语句不会执行。
wait_order():#
wait_order() 方法用于指定要按特定顺序触发的事件。它会阻塞进程,直到所有事件按指定顺序触发。
语法:
wait_order(event_1,event_2….event_n);
示例:
event e1;
event e2;
event e3;
wait_order(e1,e3,e2);
In the above example the events will get triggered in the order e1 then e3 and then e2 ,then only process gets executed otherwise it block the process. If we have specified the order and events are not executed in the order then run time error is generated. To avoid this error we can use else statement so we can get user message under else if events are not triggered in the order. Lets see with example
Example:wait_order(e1,e3,e2)else display("events are out of order");
In this example, if events are not triggered in the given order a user message in else statement is displayed, instead of run time error being generated.
code snippet:
module wait_order;
  event e1; //declaring event e1
  event e2; //declaring event e2
  event e3; //declaring event e3

  initial begin
    fork
      //process-1, triggers the event e1
      begin
        #6;
        $display($time,"\tTriggering The Event e3");
        ->e3;
      end
      //process-2, triggers the event e2
      begin
        #2;
        $display($time,"\tTriggering The Event e1");
        ->e1;
      end
      //process-3, triggers the event e3
      begin
        #8;
        $display($time,"\tTriggering The Event e2");
        ->e2;
      end
      //process-4, wait for the events to trigger in order of e1,e3 and e2
      begin
        $display($time,"\tWaiting for the Event's to trigger");
        wait_order(e1,e3,e2)
          $display($time,"\tEvent's triggered Inorder");
        else
          $display($time,"\tEvent's triggered Out-Of-Order");
      end
    join
  end
endmodule
在上面的代码中,声明了事件 e1、e2、e3,使用 wait_order 我们指定了要按顺序触发的事件为 e1、e3、e2。因此,只有当事件按照给定的顺序 e1->,e3->,e2 触发时,wait_order 下面的语句才会执行,否则将执行 else 语句。#
代码输出:

由于我们在终端中使用的是 questa 仿真器,它不支持 wait_order,所以我们得到了语法错误。因此,使用了 EDA Playground 并搭配 Synopsis 工具来获取输出。让我们看一下 EDA 输出:

在输出中,e1 在 2ns 处触发,所以首先触发了 e1,然后 e3 在 6ns 处触发,然后触发了 e3,类似地,e2 在 8ns 处触发,触发了 e2。所以所有事件都按照给定的顺序 e1->e3->e2 触发,因此 wait_order 下面的语句 “事件按顺序触发” 被执行,否则执行 else 语句 “事件按顺序触发”。
合并事件#
在合并事件中,一个事件变量被赋值给另一个变量,然后当第一个事件被触发时,第二个事件变量也会同时被触发,这是因为合并。这意味着当第二个事件变量被赋值给第一个事件变量时,第二个事件变量会等待并阻塞进程,直到第一个事件变量被触发。
语法:
event 变量1=event 变量2;
示例:
event a;
event b;
event b=a; // 合并事件 a 和 b
代码片段:
module merge_events;
  event a,b;
  initial begin
    fork
    #50 ->a;
    #30 ->b;
    #20 b = a;
      begin
        wait(a.triggered);
        $display("[%0t] event a is done",$time);
       end
         begin
           wait(b.triggered);
           $display("[%0t] event b is done ",$time);
         end
    join
  end
endmodule
在上面的代码中,声明了事件 a、b,然后通过 b=a 合并了 a、b 事件。
代码输出:

由于 Questa 仿真器不支持事件合并,因此此代码在仅使用 Cadence 工具的 EDA 中执行以获得输出。实际上,事件 b 应在 30ns 触发,事件 a 应在 50ns 触发,但我们将事件 a 合并到事件 b,因此事件 a 在 30ns 而不是 50ns 触发。因此,事件 a、b 都在 30ns 同时触发。
阻塞和非阻塞事件:#
阻塞事件#
通常,阻塞事件是使用 -> 操作符触发的。阻塞事件在活动区域中工作,因此当等待事件和触发事件同时发生时,@ 操作符会阻塞进程直到事件被触发,因此在等待事件和触发事件同时发生时,-> 操作符会阻塞事件。但是,我们可以使用 wait 操作符来避免这种阻塞。
语法:
-> 事件名称
示例:
event BJT;
-> BJT; // 使用阻塞触发触发事件//
代码片段:
module blocking_event;
  event BJT;
  initial begin
    $display($time,"\t triggering the event");
    ->BJT;
  end
  initial begin
    $display($time,"\t waiting for the event using wait");
    wait(BJT.triggered);
    $display($time,"\t event BJT is triggered using wait");
  end
  initial begin
    $display($time,"\t waiting for the event using @");
    @(BJT.triggered);
    $display($time,"\t event BJT is triggered using @");
  end
endmodule
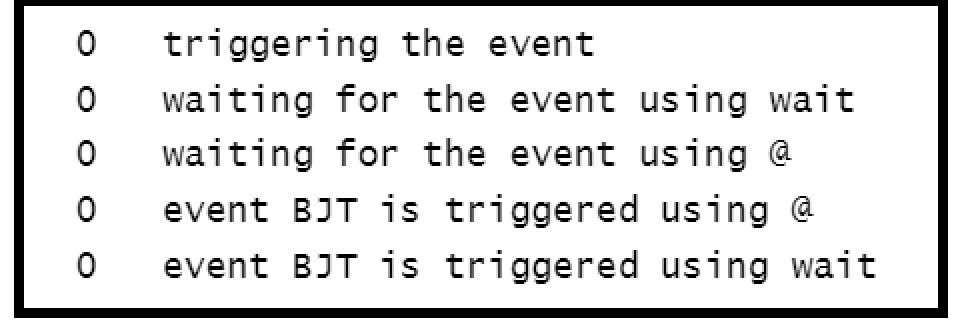
代码输出:

由于事件 BJT 是使用阻塞触发 -> BJT 声明的。由于阻塞触发和 @ 都在活动区域中工作,因此当事件的触发和等待同时发生在 0ns 时,使用 @ 操作符会阻塞语句 “event BJT is triggered using @”, 在 @(BJT.triggered) 下方。但是我们可以使用 wait(BJT.triggered) 来检测触发,因此它显示了语句 “event BJT is triggered using @"。
非阻塞事件#
非阻塞事件是使用 -» 操作符触发的。由于非阻塞事件触发工作在非阻塞区域,而 wait 或 @ 则在活动区域中工作,所以即使在等待事件和触发事件同时发生时,@ 不会阻塞进程,因此 –> 被称为非阻塞触发。这就是阻塞和非阻塞事件之间的区别。
语法:
->>事件名称
示例:
event BJT;
->> BJT; // 使用非阻塞触发触发事件//
代码片段:
module non_blocking;
  event BJT;
  initial begin
    $display($time,"\t triggering the event");
    ->>BJT;
  end
  initial begin
    $display($time,"\t waiting for the event using wait");
    wait(BJT.triggered);
    $display($time,"\t event BJT is triggered using wait");
  end
  initial begin
    $display($time,"\t waiting for the event using @");
    @(BJT.triggered);
    $display($time,"\t event BJT is triggered using @");
  end
endmodule
在上面的代码中,事件 BJT 是使用非阻塞触发 -» BJT 声明的,所以即使等待事件和触发事件同时发生,@ 不会阻塞进程,因为非阻塞触发工作在非阻塞区域,而 @ 则在活动区域中工作,因此 @ 会解除在 @(BJT.triggered) 下方的进程阻塞。
代码输出:
在代码中,BJT 是使用非阻塞触发 -» BJT 声明的,所以即使等待事件和触发事件同时发生,@ 不会阻塞进程,因此在 @(BJT.triggered) 下方显示了语句 “event BJT is triggered using @"。而对于阻塞事件,则会阻塞进程,因此不会显示语句 “event BJT is triggered using @"。这是阻塞和非阻塞事件触发之间的主要区别。
2-信号量#
信号量是 System Verilog 内置 std 包中提供的内置类。信号量允许您控制对资源的访问。从概念上讲,信号量就像是一个桶。当分配一个信号量时,会创建一个包含固定数量的键的桶。借助信号量方法,可以从桶(信号量)中获取或放置键。
类比地,信号量可以理解为自行车租赁店,我们可以从中使用自行车(键),而其他人(线程/进程)只能在自行车可用时使用自行车,并且他们(线程/进程)应该等待直到先前的自行车被归还。
现在我们将看到如何在 System Verilog 中使用信号量。
语法:
semaphore semaphore_name;
方法:#
信号量是一个内置类,提供以下方法:

I. new()
II. get()
III. put()
IV. try_get()
I-new() :#
该方法用于创建具有特定数量键的信号量。
语法:
semaphore_name=new(n);
这里,关键计数(即n)是一个整数。
默认情况下,n=0。
如果信号量没有正确创建,它会返回null。
关键计数是最初给予信号量的值。如果需要,也可以通过向信号量中放入更多的关键(使用put()方法)来增加信号量中的关键数量,而不是移除关键数量。
II-get()#
get() 用于从信号量中获取指定数量的关键。
语法:
semaphore_name.get(m);
默认情况下,m=1。
如果线程/进程没有可用的关键(即,如果任何其他线程/进程正在使用信号量的关键),它将等待,直到关键回到信号量,然后执行其操作。
III-put()#
此方法用于将其关键返回给信号量。
语法:
semaphore_name.put(k);
默认情况下,k=1。
示例:
以下是创建信号量句柄及其中的关键以及如何使用上述方法获取和放入信号量的关键的示例。
代码片段:
在下面的示例中,我们尝试找出如果一个进程只返回了部分获取的关键,然后稍后放回其余关键会发生什么。
  module semaphore_example_1;

     semaphore sem=new(6);

     initial begin :BEGIN_I
        $display("In first initial block At time=[%0t] ",$time);
        sem.get(4);
        $display("Thread 1:Accessing 4 keys from semaphore At time=[%0t] ",$time);
        #5;
        sem.put(4);
        $display("Thread 1:Done using 4 keys At time=[%0t] ",$time);
     end :BEGIN_I

     initial begin :BEGIN_II
        $display("In second initial block At time=[%0t] ",$time);
        sem.get(2);
        $display("Thread 2:Accessing 2 keys from semaphore At time=[%0t] ",$time);
        #10;
        sem.put(2);
        $display("Thread 2:Done using 2 keys At time=[%0t] ",$time);
     end :BEGIN_II

  endmodule :semaphore_example_1
输出:
在上面的代码中,我们创建了6个关键字。在0纳秒的时间里,进程1从信号量中获取4个关键字,而进程2则获取2个关键字。然后,在5纳秒的时间里,进程1将4个关键字放回信号量,而在10纳秒的时间里,进程2将2个关键字放回信号量。

示例-2:
代码片段:
在下面的代码中,我们试图解释如果我们尝试获取比可用关键字更多的关键字会发生什么。
  module semaphore_exm_2;

     semaphore sem=new(6);

     initial begin :BEGIN_I
        $display("In first initial block At time=[%0t]",$time);
        sem.get(4);
        $display("Thread 1:Accessing 4 keys from semaphore  At time=[%0t]",$time);
        #5;
        sem.put(2);
        $display("Thread 1:Done using 2 keys  At time=[%0t]",$time);
        #20;
        $display("Thread 1:Still using the remaining 2 keys  At time=[%0t]",$time);
     end :BEGIN_I

     initial begin :BEGIN_II
        $display("In second initial block  At time=[%0t]",$time);
        sem.get(5);
        $display("Thread 2:Accessing 5 keys from semaphore  At time=[%0t]",$time);
        #10;
        sem.put(5);
        $display("Thread 2:Done using 5 keys  At time=[%0t]",$time);
    end :BEGIN_II

  endmodule :semaphore_exm_2
输出:
在上面的代码中,我们创建了6个关键字。在0纳秒的时间里,进程1从信号量中获取4个关键字,而进程2试图从信号量中获取5个关键字,但是一次只有2个关键字可用,所以它会阻塞下一条语句,直到信号量中有5个关键字可用。然后在5纳秒的时间里,进程1将2个关键字放回信号量,而在此时,信号量中有4个关键字可用,所以进程2再次等待。在25纳秒的时间里,进程1仍在使用关键字,但是进程1结束了,但在信号量中只有4个关键字可用,所以进程2无法执行。

IV-try_get()#
此方法也用于从信号量中获取指定数量的关键字。但与get()方法不同的是,如果关键字不可用,它将不会等待,而是返回0,然后执行下一步。
语法:
semaphore_name.try_get(j);
默认情况下,j=1。
如果指定数量的关键字可用,则方法返回1并继续执行
如果指定数量的关键字不可用,则方法返回0并继续执行
代码片段:
此代码有助于理解如何使用try_get()方法以及它与get()方法的区别。
 module semaphore_exa_get_try;

     semaphore car_key = new(1);

     initial begin :BEGIN_I

        fork

         begin :BEGIN_I_FORK
            $display("person A Waiting for car, time=%0t", $time);
            car_key.get(1);
            $display("person A Got the car, time=%0t", $time);
            #10;
            car_key.put(1);
            $display("person A Returning back car, time=%0t", $time);
         end :BEGIN_I_FORK

         begin :BEGIN_II_FORK
            #1;
            $display("person B Waiting for car, time=%0t", $time);
            void'(car_key.try_get(1));
            $display("person B Got the car, time=%0t", $time);
            #10;
            car_key.put(1);
            $display("person B Returning back car, time=%0t", $time);
         end :BEGIN_II_FORK

       join

    end :BEGIN_I

  endmodule:semaphore_exa_get_try
输出:
在上面的代码中,我们创建了一个关键字。在0纳秒的时间里,人员A等待关键字并从信号量中获取了一个关键字。在1纳秒的时间里,人员B等待关键字,而在1纳秒的时间里,信号量中没有关键字,但是这里使用了try_get方法,所以它不会阻塞下一条语句,因此在1纳秒的时间里,显示人员B获得了车辆。在10纳秒的时间里,进程1放入了关键字并显示人员A将车返回。在11纳秒的时间里,进程2放入了关键字并显示人员B将车返回。

3-邮箱#
SystemVerilog的邮箱是不同进程之间进行数据交换的一种方式。一个进程可以将数据放入邮箱,邮箱会将数据存储在内部,然后可以由另一个进程检索。邮箱的行为类似先进先出(FIFO)。
邮箱的类型#
邮箱分为两种类型。

图-1 邮箱的类型
根据大小,邮箱可以分为两种形式:-
- 有界
- 无界
通用邮箱#
通用邮箱可以放置或获取任何数据类型的数据,如整型、位、字节、字符串等。默认情况下,邮箱是无类型或通用类型的邮箱。
语法
mailbox <mailbox_name>;
I. 有界#
如果邮箱的大小已定义,则为有界邮箱。当邮箱已满时,无法再将数据放入邮箱,直到从邮箱获取项目或数据。
语法:
mailbox <mailbox_name> = new(size);
代码片段:
class A;

   int a;
   int i;
   mailbox m;

   function new(mailbox m1);
      this.m = m1;
   endfunction

   task tra_data();

      for(i =0;i<3;i++)begin:BEGIN_MAIN

         if(m.num()==2)begin:BEGIN_1
         $display("mailbox is full");

      end:BEGIN_1

      else
         begin:BEGIN_2

            a++;
            m.put(a);
            $display("[%0t] 1. Transmitter: value of a = %0d",$time,a);

         end:BEGIN_2

      end:BEGIN_MAIN

   endtask

endclass:A

class B;

   int a;
   int i;
   mailbox m;

   function new(mailbox m2);
      this.m = m2;
   endfunction

      task rec_data();

         begin:BEGIN_MAIN

            m.get(a);
            $display("[%0t] 2. Receiver: value of a = %0d",$time,a);
         end:BEGIN_MAIN

   endtask

endclass:B

module tb();

   A a1;
   B b1;
   mailbox mb = new(2);

   initial begin:BEGIN_MAIN

      a1 = new(mb);
      b1 = new(mb);
      repeat(3)

      begin:BEGIN_1

         a1.tra_data();
         $display("...............................................");
         b1.rec_data();

      end:BEGIN_1

   end:BEGIN_MAIN

endmodule:tb
输出:
在上图中,您可以看到创建了一个名为 Class A 的类,它每次传输3个数据。我们通过 num 方法来检查邮箱是否已满。由于我们在模块中将邮箱绑定为2,它将传输两个数据,但对于第三个数据,它显示邮箱已满,因为其中没有空间。对于接收器,由于我们限制它一次只接收一个数据,它将只接收一个数据。由于我们在模块中给出了 repeat(3),因此该过程会重复3次。
了解更多关于 num() 方法的信息:- https://github.com/mbits-mirafra/SystemVerilogCourse/wiki/19.Interprocess-Communication#2-num
II. 无界#
如果未定义邮箱的大小,则为无界邮箱。
语法:
mailbox <mailbox_name> = new();
代码片段:
class A;

   int a;
   int i;
   mailbox m;

   function new(mailbox m1);
      this.m = m1;
   endfunction

   task tra_data();

      for(i =0;i<3;i++)begin:BEGIN_MAIN

         a++;
         m.put(a);
         $display("[%0t] 1. Transmitter: value of a = %0d",$time,a);

      end:BEGIN_MAIN

   endtask

endclass:A

class B;

   int a;
   int i;
   mailbox m;

   function new(mailbox m2);
      this.m = m2;
   endfunction

   task rec_data();

      begin:BEGIN_MAIN

         m.get(a);
         $display("[%0t] 2. Receiver: value of a = %0d",$time,a);

      end:BEGIN_MAIN


   endtask

endclass:B


module tb();

   A a1;
   B b1;
   mailbox main = new();

   initial begin:BEGIN_MAIN

      a1 = new(main);
      b1 = new(main);
      repeat(2)
      begin:BEGIN_1

         a1.tra_data();
         $display("...............................................");
         b1.rec_data();

      end:BEGIN_1

    end:BEGIN_MAIN

endmodule:tb
输出:
在上图中,您可以看到创建了一个名为 Class A 的类,它每次传输3个数据。与 有界 不同,由于其大小不受限制,它可以一次性接收所有三个数据并传输它们,接收器仅接收一个数据,然后接收下一个数据(因为使用了 repeat(3) ),因为它是无界的。
参数化邮箱#
参数化邮箱可以放置或获取特定数据类型的数据。当数据类型需要固定时,参数化邮箱非常有用。对于数据类型的差异,将出现编译错误。
语法:
mailbox #(<type>) <mailbox_name>
代码片段:
class A;
   int i;
   string country;
   string place;

   mailbox #(string) m;

   function new(mailbox m1);
      this.m = m1;
   endfunction

   task tra_data();

      country = "India";
      place = "Kashmir";
      m.put(country);
      m.put(place);
      $display("Transmitter: Country = %0s , must visit place = %0s",country,place);

      country = "South Africa";
      place = "Cape Town";
      m.put(country);
      m.put(place);
      $display("Transmitter: Country = %0s , must visit place = %0s",country,place);

      country = "Spain";
      place = "Barcelona";
      m.put(country);
      m.put(place);
      $display("Transmitter: Country = %0s , must visit place = %0s",country,place);

   endtask

endclass:A

class B;

   string country;
   string place;
   mailbox #(string) m;

   function new(mailbox m2);
      this.m = m2;
   endfunction

   task rec_data();

       m.get(country);
       m.get(place);
       $display("Receiver: Country = %0s , must visit place = %0s",country,place);

        m.get(country);
        m.get(place);
        $display("Receiver: Country = %0s , must visit place = %0s",country,place);

        m.get(country);
        m.get(place);
        $display("Receiver: Country = %0s , must visit place = %0s",country,place);
   endtask

endclass:B

module  tb();

   A a1;
   B b1;
   int i;
   mailbox #(string) main = new(6);
   initial begin:BEGIN_MAIN

      a1= new(main);
      b1 = new(main);
      $display("");
      $display("");
      a1.tra_data();
      $display(".......................................................................");
      b1.rec_data();

   end:BEGIN_MAIN

endmodule:tb
输出:
在上图中,您可以看到我们将邮箱固定为字符串数据类型。我们取了两个字符串 country 和 place,并将邮箱绑定到大小为6。由于邮箱是字符串类型,我们只会传递字符串值 India、kashmir、South Africa、Cape Town、Spain 和 Barcelona。如果是其他数据类型,将会抛出编译错误。
邮箱中的方法#
| 序号 | 方法名称 | 描述 |
|---|---|---|
| 1. | new(function) | 返回邮箱句柄。一个参数代表有界邮箱大小,否则就是无界邮箱。 |
| 2. | num(function) | 返回邮箱中的消息数量。 |
| 3. | put(task) | 将数据存储在邮箱中的阻塞方法。 |
| 4. | get(task) | 从邮箱中检索数据的阻塞方法。 |
| 5. | try_put(function) | 如果邮箱未满,则将数据存储在邮箱中并返回1,否则返回0的非阻塞方法。 |
| 6. | try_get(function) | 如果邮箱非空,则返回数据,否则返回0的非阻塞方法。 |
| 7. | peek(task) | 从邮箱中复制数据而不将其从邮箱中移除的方法。 |
| 8. | try_peek(function) | 尝试从邮箱中复制数据而不将其从邮箱中移除的方法。 |
I. new#
通过此方法创建邮箱。
语法:
mailbox <mailbox_name> = new(size); // 创建有界邮箱

mailbox <mailbox_name> = new(); // 创建无界邮箱
代码片段:
class A;

   int a;
   int i;
   mailbox  m;

   function new(mailbox m1);
      this.m = m1;
   endfunction

   task check();

      if(m == null)begin:BEGIN_1
         $display("Mailbox is not created");
      end:BEGIN_1

      else
         $display("Mailbox is created");

         for(i=0;i<3;i++)begin:BEGIN_2

            a++;
            m.put(a);
            $display("Value of a = %0d",a);

         end:BEGIN_2

    endtask

endclass:A

module  tb();

   A a1;
   mailbox main = new(3);
   initial begin:BEGIN_MAIN

      a1= new(main);
      $display("");
      $display("");
      a1.check();

    end:BEGIN_MAIN

endmodule:tb
输出:
在上图中,我们创建了一个大小为3的有界邮箱,并检查它是否已创建。由于它已创建,我们将3个数据传输到其中。
II. num#
此方法返回邮箱中的消息数量。
语法:
<mailbox_name>.num();
代码片段:
class A;

   int a;
   int i;
   mailbox m;

   function new(mailbox m1);
      this.m = m1;
  endfunction

  task tra_data();

     for(i =0;i<3;i++)begin:BEGIN_MAIN

        a++;
        m.put(a);
        $display("[%0t] Transmitter: value of a = %0d",$time,a);
        $display(" No of messages in mailbox = %0d",m.num());

      end:BEGIN_MAIN

      $display(".....................................................");

   endtask

endclass:A

module tb();

   A a1;
   mailbox main = new();

   initial begin:BEGIN_MAIN

      a1 = new(main);
      repeat(2)
      begin:BEGIN_1

         a1.tra_data();

    end:BEGIN_1

   end:BEGIN_MAIN

endmodule:tb
输出:
在上图中,您可以看到我们创建了一个无界邮箱,并且我们一次传输了三个数据。由于它是无界的,我们没有任何限制,我们可以传输所有数据。现在第一次传输时,传递的值是1、2、3,可以通过 num() 方法看到邮箱中的消息数量为3。我们重复了该过程两次,以便我们能够传递4、5、6,现在邮箱中的消息数量为6。
III. put#
此方法按照FIFO顺序将数据存储到邮箱中。如果邮箱已满,它将阻塞该过程。
语法:
<mailbox_name>.put(arguments);
代码片段:
class A;

   int a;
   int i;
   mailbox m;

   function new(mailbox m1);
      this.m = m1;
   endfunction

   task tra_data();

      for(i =0;i<4;i++)begin:BEGIN_MAIN

         m.put(a);
         #1 a++;
         $display("[%0t] 1. Transmitter: value of a = %0d",$time,a);

      end:BEGIN_MAIN

      $display(".....................................................");

   endtask

endclass:A

class B;

   int a;
   int i;
   mailbox m;

  function new(mailbox m2);
     this.m = m2;
  endfunction

  task rec_data();

     begin:BEGIN_1

        m.get(a);
        $display("[%0t] 2. Receiver: value of a = %0d",$time,a);

     end:BEGIN_1

   endtask

endclass:B

module tb();

   A a1;
   B b1;
   mailbox main = new(3);

   initial begin:BEGIN_MAIN

      a1 = new(main);
      b1 = new(main);
      repeat(2)
      begin:BEGIN_1

         a1.tra_data();
         $display("................................................................");
         b1.rec_data();

      end:BEGIN_1

   end:BEGIN_MAIN

endmodule:tb
输出:
在上图中,您可以看到邮箱的大小为3,但我们正在尝试传递4个数据,因为put是一个阻塞任务,它不会允许其他任务执行,直到或除非它获取第四个数据,这是不可能的(因为邮箱的大小为3),因此程序终止。
IV. get#
如果邮箱为空,此方法可以从邮箱中检索一条消息,它将阻塞该过程。
语法:
<mailbox_name>.get(arguments);
代码片段:
class A;

   int a;
   int i;
   mailbox m;

   function new(mailbox m1);
      this.m = m1;
   endfunction

   task tra_data();

      for(i =0;i<2;i++)begin:BEGIN_MAIN
         a++;
         m.put(a);
         $display("[%0t] 1. Transmitter: value of a = %0d",$time,a);

      end:BEGIN_MAIN

      $display("put successful");

   endtask

endclass:A

class B;

   int a;
   int i;
   mailbox m;

   function new(mailbox m2);
      this.m = m2;
   endfunction

   task rec_data();

      for(i =0;i<3;i++)begin:BEGIN_MAIN

         m.get(a);
         $display("[%0t] 2. Receiver: value of a = %0d",$time,a);

      end:BEGIN_MAIN

      $display("get successful");
   endtask

endclass:B

module tb();

   A a1;
   B b1;
   mailbox main = new(2);

   initial begin:BEGIN_MAIN

      a1 = new(main);
      b1 = new(main);
      repeat(2)
      begin:BEGIN_1

         a1.tra_data();
         $display("...............................................");
         b1.rec_data();
      end:BEGIN_1

   end:BEGIN_MAIN

endmodule:tb
输出:
在上图中,您可以看到邮箱的大小为2,我们正在尝试传递2个数据,但在接收器端,我们正在尝试一次接收3个数据。因此,它将首先接收2个数据,因为大小为2,并继续等待其他数据。由于这是不可能的,它将终止程序,并且不会打印 $display(“get successful”) 行。
V. try_put#
此方法尝试以非阻塞的方式将数据放入邮箱中,如果邮箱未满则存储消息。如果成功返回1,否则返回0。
语法:
<mailbox_name>.try_put(arguments);
代码片段:
class A;

   int a;
   int i;
   mailbox m;

   function new(mailbox m1);
      this.m = m1;
   endfunction

  task tra_data();

     for(i =0;i<4;i++)begin:BEGIN_MAIN

        a++;
        if( m.try_put(a))
           $display("[%0t] 1. Transmitter: value of a = %0d",$time,a);
        else
           $display("failed while trying to put data=%0d",a);

    end:BEGIN_MAIN
    $display(".....................................................");

  endtask

endclass:A

class B;

   int a;
   int i;
   mailbox m;

   function new(mailbox m2);
      this.m = m2;
   endfunction

   task rec_data();

      repeat(3) begin
         m.get(a);
         $display("[%0t] 2. Receiver: value of a = %0d",$time,a);
      end

   endtask

endclass:B

module tb();

   A a1;
   B b1;
   mailbox main = new(3);

   initial begin:BEGIN_MAIN

      a1 = new(main);
      b1 = new(main);
      repeat(2)
      begin:BEGIN_1

         a1.tra_data();
         b1.rec_data();

      end:BEGIN_1

   end:BEGIN_MAIN

endmodule:tb
输出:
在上图中,您可以看到邮箱的大小为3,但我们正在尝试传递4个数据,与 put_method 不同(它会阻止下一组执行),它不会阻止,而是执行下一组程序。正如您所看到的,即使邮箱已满,它也会继续执行下一组语句,并打印 $display(failed to get the value) 语句。
VI. try_get#
这是一个非阻塞方法,它尝试从邮箱中获取一条消息,如果邮箱为空则返回0。
语法:
<mailbox_name>.try_get(arguments);
代码片段:
class A;

   int a;
   int i;
   mailbox m;

   function new(mailbox m1);
      this.m = m1;
   endfunction

   task tra_data();

      for(i =0;i<4;i++)begin:BEGIN_MAIN

         a++;
         m.put(a);
         $display("[%0t] 1. Transmitter: value of a = %0d",$time,a);

      end:BEGIN_MAIN

      $display("put successful");

   endtask

endclass:A

class B;

   int a;
   int i;
   mailbox m;

   function new(mailbox m2);
      this.m = m2;
   endfunction

   task rec_data();

      repeat(5)begin:BEGIN_MAIN

         if( m.try_get(a))
            $display("[%0t] 2. Receiver: value of a = %0d",$time,a);

         else
            $display("Failed while getting the value as mailbox is empty ");

      end:BEGIN_MAIN

      $display("get successful");

   endtask

endclass:B

module tb();

   A a1;
   B b1;
   mailbox main = new(4);

   initial begin:BEGIN_MAIN

      a1 = new(main);
      b1 = new(main);
      repeat(2)
      begin:BEGIN_1

         a1.tra_data();
         $display("...............................................");
         b1.rec_data();
       end:BEGIN_1

   end:BEGIN_MAIN

endmodule:tb
输出:
在上图中,您可以看到邮箱的大小为4,但我们正在尝试传递4个数据,但在接收器端,我们正在尝试一次获取5个数据。因此,首先我们传输了值为1、2、3、4的数据,然后在接收器端,我们也在等待第五个数据。由于这是非阻塞方法,它将转到下一组执行并打印 (“get successful”)。
VII. peek#
此方法从邮箱中复制一条消息,而不将消息从邮箱队列中移除。
语法:
<mailbox_name>.peek(arguments);
代码片段:
class A;

   int a;
   int i;
   mailbox m;

   function new(mailbox m1);
      this.m = m1;
   endfunction

   task tra_data();

      for(i=0;i<1;i++)begin:BEGIN_MAIN

         a++;
         m.put(a);
         $display("[%0t] 1. Transmitter: value of a = %0d",$time,a);

      end:BEGIN_MAIN

      $display("put successful");
      $display("Messages in mailbox = %0d",m.num());

   endtask

endclass:A

class B;

   int a;
   int i;
   mailbox m;

   function new(mailbox m2);
      this.m = m2;
    endfunction

   task rec_data();

      for(i =0;i<2;i++)begin:BEGIN_MAIN
         m.peek(a);
         $display("[%0t] Peeking value of a = %0d",$time,a);
         $display("Peek successful");

      end:BEGIN_MAIN

      m.get(a);
      $display("[%0t] 2. Receiver: value of a = %0d",$time,a);
      $display("get successful");
      $display("Messages in mailbox = %0d",m.num());
   endtask

endclass:B

module tb();

   A a1;
   B b1;
   mailbox main = new(2);

   initial begin:BEGIN_MAIN

     a1 = new(main);
     b1 = new(main);
     a1.tra_data();
     $display("...............................................");
     b1.rec_data();
     $display("...............................................");
     b1.rec_data();
     $display("End of program");

   end:BEGIN_MAIN

endmodule:tb
输出:
在上图中,您可以看到邮箱的大小为2,但我们只传输了1个数据,但在接收器端,我们对传输的值进行了两次查看(复制)(a=1)。现在邮箱为空,由于 Peek 是一个阻塞任务,当我们再次尝试调用 bi.rec_data() 时,它将阻止 m.peek(a) 后面的所有语句,因此不会显示 End of program。
VIII. try_peek#
此方法尝试从邮箱中复制数据,而不将其从邮箱中移除。
语法:
<mailbox_name>.try_peek(arguments);
代码片段:
class A;

   int a;
   int i;
   mailbox m;

   function new(mailbox m1);
      this.m = m1;
   endfunction

   task tra_data();

      for(i=0;i<1;i++)begin:BEGIN_MAIN

         a++;
         m.put(a);
         $display("[%0t] 1. Transmitter: value of a = %0d",$time,a);

      end:BEGIN_MAIN

      $display("put successful");
      $display("Messages in mailbox = %0d",m.num());

   endtask

endclass:A

class B;

   int a;
   int i;
   mailbox m;

   function new(mailbox m2);
      this.m = m2;
   endfunction

   task rec_data();

     for(i =0;i<2;i++)begin:BEGIN_MAIN

        if( m.try_peek(a)) begin:BEGIN_1
           $display("[%0t] Peeking value of a = %0d",$time,a);
           $display("Peek successful");

        end:BEGIN_1
        else
           begin

              $display("Peek failed as mailbox is empty");
              return;
           end
     end:BEGIN_MAIN

     m.get(a);
     $display("Receiver: value of a = %0d",a);
     $display("get successful");

   endtask

endclass:B

module tb();

   A a1;
   B b1;
   mailbox main = new(2);

   initial begin:BEGIN_MAIN

      a1 = new(main);
      b1 = new(main);
      a1.tra_data();
      $display("...............................................");
      b1.rec_data();
      $display("...............................................");
      b1.rec_data();
      $display("End of program");

   end:BEGIN_MAIN

endmodule:tb
Output:

在上图中,您可以看到邮箱的大小为2,但我们只传输了1个数据,但在接收器端,我们对传输的值进行了两次查看(复制)(a=1)。现在邮箱为空,由于 try_peek 是一个阻塞任务,当我们再次尝试调用 bi.rec_data() 时,它将尝试查看该值。由于邮箱为空,它将打印 peek is failed,然后 End of program 也会被执行。